Friday, January 21, 2011

Fred X Brownstein's bust of Albert Rubin M.D.

We wanted to share with you a sculpture that went through Campbell Plaster & Iron before the holidays. Our dear friend Fred X Brownstein was commisioned by the Rogosin Institute in New York to sculpt a bust of it's founder Albert L. Rubin M.D.
Dr. Rubin who died in 2008, was the first nephrologist in New York to provide kidney dialysis and renal transplantation. He then created The Rogosin Institute and built it into one of New York City's leading research centers, specializing in kidney disease but also reasearch into cancer, diabetes, and other pressing health concerns. 
The bust is 18""x 14" and 9" deep
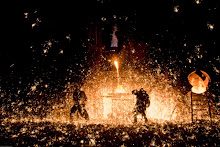
The tradional toast when work is completed at CP&I

The finished mounted piece

Albert L. Rubin M.D


Fred did an amazing job, as usual, and if you'd like to see more work from this talented sculptor his website is http://fredxbrownstein.com/ and his work is featured here http://www.nationalsculpture.org/showcase/default.asp?view=default&artist_id=112&page_id=1


Saturday, September 25, 2010

Back from Germany!


CP&I was closed for most of the month of August while Glenn and I traveled to Germany as part of an art exchange called Salem2Salem. It was an exchange between Salem, Germany and Salem Art Works in Salem, New York http://salemartworks.com/. Needless to say, it was an amazing experience. We were among 36 artists working in the disciplines of digital art, literature, music, painting, photography and sculpture who lived, worked and otherwise "played" together in Castle Salem. We will always remember our fellow residents and hope to see them all next year here in the states. If you'd like to know more about the project, the website link is http://www.salem2salem.de/
We were both thrilled for the opportunity to create art in such a beautiful environment and learn so much about Germany and it's culture. Glenn was finally able to take off his "foundry hat" and relax into a true creative process, as I'm sure you will see in the images below.

The making of the armature.

The rough modeling of the clay.

Finished clay surface.
The textures used were gathered from the shop here in West Rutland, and from the grounds around Salem Germany.

Plaster waste mold in process.

The mold was chipped away.

The plaster sculpture after the waste mold is removed.

Making the forged steel clips at our good friend Michael Denker's shop. Michael is the castle's Kunstschmied und Schlossermeister (blacksmith and locksmith). Great guy. Very talented.

Using pigments to finish the surface.

The clips represent human attempts to repair the damage caused by our neglect and greed.
There is a golden forged steel sprout (shown below) breaking through the surface that speaks of mother's nature's wisdom and strength to prevail, even beyond man's best efforts.


"Mother Knows Best" hanging in the Neue Museum at Schloss Salem.

I will continue to periodically write about the CP&I European Tour, but for now it's back to West Rutland....and 80 Marble Street, otherwise known as the old Joy Theatre.


Thursday, June 24, 2010

Three Part Harmony

Here is the finished bronze discribed in our last post on the making of a poured rubber mold. Martha calls it "Three Part Harmony". We thank her for sending us the final image , and we hope to be sharing more of Martha's work with you in the future.

Wednesday, March 17, 2010

The making of a poured rubber mold from an oil-clay original (artwork by Martha Bartsch)


Creating a parting line:

-the original is placed on a mold board and wood blocks are placed just below the decided parting line

-3 or 4 balls of soft water clay are wrapped in plastic and placed under the original for support and protection (notice one of the clay balls under the rider's left shoulder


Creating a parting line:

-a water clay wall placed on the blocking at the level of the parting line


Creating a parting line:

-a plaster wall the same level of the water clay making the parting line approx. 2” wide


Creating a parting line:

-shellac is put on the plaster wall as a sealer and to act as a visual guide when making the mother mold


First clay blanket:

-moist paper toweling is placed over the original and then a 1/4” clay blanket is placed over the toweling.

-keys, vents and a pour cup are are also made


First mother mold:

-a plaster mother mold is made over the clay, leaving the pour cup exposed (the shellac on the parting line is used as a reference when making the edge of the mother mold)


The entire mold is turned over exposing the underside of the parting line


The parting line is removed exposing the edge of the first mother mold and clay blanket


Keys are cut into the edge of the mother mold and then shellaced. The oil clay pour spout and vent blanks can be seen in the first clay blanket. These will make the pour spout and vents to cast in when the rubber mold is finished


Second clay blanket:

-moist paper toweling is placed over the oil clay original


Second clay blanket, keys, vents and pour cup


Second mother mold with pour cup exposed


First poured rubber:

-the first mother mold is removed exposing the original, first clay blanket and the oil clay blanks for the pour cup and vents


First poured rubber:

-the underside of the first mother mold after the clay is removed


First poured rubber:

-the parting line for the first pour is finished off and the keys are cut


First poured rubber:

-a paint coat of rubber is put on the original to capture all the detail and where the clay parting line meets the original to seal the seam


First poured rubber:

-the underside of the first mother mold is scraped and steel wooled to smooth the surface, then a thin layer of vasaline is rubber into the surface to release it from the first poured rubber


First poured rubber:

-here is the void left by the first clay blanket which will be filled with rubber (the plaster end cap has been removed to show this and will be reattached to pour the first rubber)

First poured rubber:

-the first rubber has been poured. PVC pipe is used for the pour spout and vent

Second poured rubber


The first mother mold is removed exposing the first poured rubber


The first rubber is removed and seated into the first mother mold (notice the pour spout and vents left by the oil clay blanks)


The second mother mold and rubber are removed from the original and fitted together.....

the mold is finished!

Friday, January 22, 2010

Samuel and The Whale

In recapping some of the highlights of 2009, we'd like to recognize a very talented artist and dear friend, Jim Sardonis. Jim and his work were prominent in the shop during the year long preparation for the "mergefest" and he was privy to the various ups and downs and ins and outs of that time in our lives. Thanks Jim for being our witness to "the process"
You can see more of Jim's work by going to Our Favorite Links on right.

The first project Jim brought in was a 14 inch clay macquette that was to be enlarged to an over life size figure and cast in bronze. It was the figure of Samuel de Champlain in honor of the Lake Champlain Quadricentennial celebrations to be installed at Champlain College.
Vicky (the pantograph) was set up and a wood and steel armature to hold they clay was made to scale.


This is the rough clay work in progress. Once completed the enlargement was delivered to Jim's studio in Randolph for him to finish the final surface.


After casting Sam in nine pieces, he was fit back together and welded into place.


Finally Mr. Champlain is starting to look like himself again. Now the bronze is ready for a liver of sulpfur and cupric nitrate hot patina.


After the patina is finish and Sam is waxed, he travels to Granite Importers in Barre to be mounted on the finished pedestal.


Let the unveiling begin!
Nice technique Jim.

The reception after was fabulous and we were able to meet and dine with Dr. David Hackett Fischer , the author of "Champlain's Dream" a fascinating book describing the complete history of Samuel's arrival to this region. It was a wonderful and well attended event!


Next Jim was commisioned to enlarge one of his infamous whale tails for a private residence in Rumson New Jersey. Many of you may have spotted the two large granite tails of Jim's in Burlington Vermont.

Vicky was set up again with a new ratio to get points from
the maquette for the enlargement.
Here is the wood and steel armature before the claywork.


After the pieces were cast, welded together and chased,
the patina begins.
This is the finished piece installed in the front lawn of a magnificent home. Nice!

 
campbellplasterandiron.blogspot.com